Post-Alpha Feature: AI-supported MyHub authoring toolkit
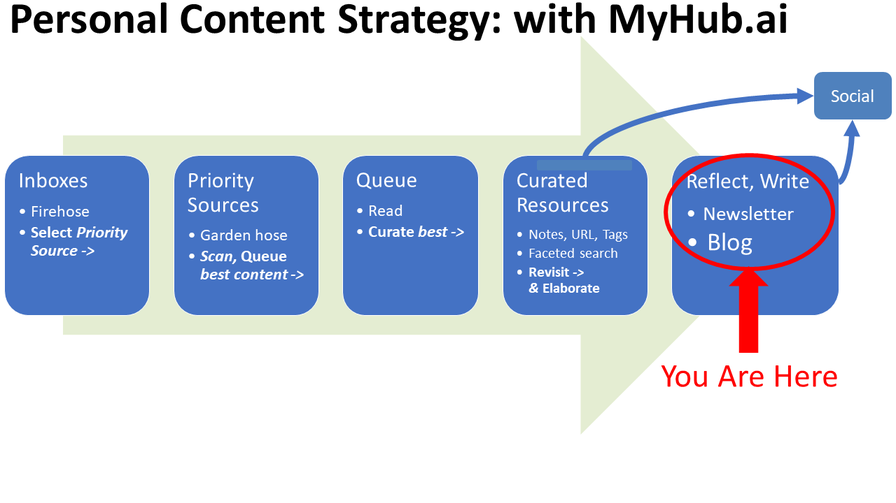
MyHub.ai (post alpha) features support everything from Priority Sources through to Curation and Sharing - see FAQ, video.
An innovative writing environment to further extend the productivity tools offered to MyHub Editors.
FAQ: How does MyHub support my personal productivity? sets out how MyHub.ai supports your productivity from 'taming the firehose' of content coming at you from multiple sources, through to annotating and tagging the best content as you store it in your Hub.
But what about the actual writing, at the very end of the process? I explored this with some participants to the Interhackt design hackathon in late 2020, resulting in some clickable wireframes captured in this short video, and explained in more detail below.
Just to emphasise: this is part of the 'post-alpha' development programme. The links below point to clickable wireframes - they're ugly, only a few things can be clicked, so you will need to use your imagination. Text in bold italic are things you can do.
1) Start at your Private Reading Queue
The video starts at this wireframe of your Private Reading Queue, which stores everything you've identified as worth reading properly.
- Content appears here when you one-click it from browser or phone, or it was published by one of your "Priority Sources": a Hub or Twitter account you Follow, a Twitter List or enewsletter, etc.
- Everything is pre-tagged by the AI engine, so you can filter your Queue by tag, as well as source, content credibility, language, etc.
Note: Since creating the video I've renamed this private area "WorkSpace" (as opposed to your "PublicFace" Hub), as a Workspace can also contain the Public Resources you've already read, annotated and published.
2) Choose "Create Content" from the MyHub dropdown, upper right
At the top right hand corner of the above wireframe, click the MyHub dropdown and select 'Create Content'.
A text box appears. This is where you describe what you want to write about, with lots of keywords.
The MyHub.ai AI engine processes this to create the 'taxonomic DNA' of the article you want to write when you click 'Start' to move to the authoring environment (next).
So Click 'Start' .
3) Authoring environment: explore and grab relevant content
You're in a wireframe of the the authoring environment's "IDEAS" tab. It is composed of two panes.
The main pane, right, contains a zoomable user interface (ZUI) to the most relevant resources for your article:
- The 'core galaxy' in the centre contains your resources with the best match to the 'taxonomic profile' of the article you want to write
- It is surrounded by other clusters of content containing resources relevant to different aspects of your article.
To get a better idea of what this could look like, check out the giantgraph for "ZUI", developed by other Interhackt participants, below, or some other examples:
Now go back to the authoring environment wireframe and Click on the Core Galaxy to zoom into this cluster.
Inside, you will find all resources which most closely match your article's 'taxonomic DNA'. Size and colour will distinguish between resources you have already annotated, your other private notes, and resources still in your reading Queue. You will be able to zoom in on one Resource, read your notes, visit the full article, and explore how it links to others.
But you can do more than explore this universe of relevant content: with a click, you can put the most useful resources into the Selected notes pane (left). So:
- Click on some of the resources to add them to the Selected notes pane,
- then Click the 'WRITE' tab to go to the writing canvas.
4) Writing canvas
If you followed the previous step, you're in a wireframe of the authoring environment's "WRITE" tab.
The knowledge visualisation has been replaced by a writing canvas, currently empty (well, you did just get here). The resources you selected, however, are still on the left. Before you start writing, you might reorder them in the Selected notes pane (not possible in the wireframe) using the drag handles. Why?
Most resources contain your notes. Clicking a resource copies those notes, and a title-link to any Resource you've annotated, into your writing canvas.
Click the first three articles to copy your notes on each into the writing pane.
The authoring environment has another trick up its sleeve. The last four articles cover similar ground, so select them and click the red 'play' button to get an autosummary of all four added to your writing canvas.
What does this achieve?
If you write smart notes, according to Sönke Ahrens, when you get around to writing something you'll find the job already half done before you start: you just need to line the right notes up and link them together.
However, this only works if you can find all your relevant notes! The above tools allow you to:
- explore all of your relevant notes... and even those resources you've only identified as valuable, but not yet read.
- identify the ones you want to use
- grab your notes directly into your article, accompanied by links
- and even use autosummary tools.
Related reading
More Stuff I Do
More Stuff tagged myhub , writing , productivity , post-alpha
See also: Content Creation & Marketing , Personal Productivity , Communications Tactics